Introduction to Java Code Analysis
by Coleman Kane
This lecture will introduce analysis of malware written in the Java language, as a common threat that also serves as a good case study in malware targeting a non-x86 architecture. Java programs run within a JVM that serves as a “virtual CPU”, with native object types that are higher-level than those common to electronic processors. There are a number of tools that work to analyze Java, and Ghidra is one of these tools. We will start with some simple example programs, review the various ways that “Java programs” can be bundled, and then analyze these with the tools we have available.
Java Basics
At its core, the Java programming language is a strictly object-oriented programming language. This means that, unlike C++ which offers Object Oriented extensions on top of the C programming language, Java requires a developer to adopt object-oriented programming techniques. This means that the core “main function” of the program must be within a class, all functions are class methods, and all data is organized in class objects.
Also unlike C++, Java enforces a strict one-class-per-file constraint on the developer. When
a java program is compiled, a *.class is created to hold the compiled Java code, and is
given the same name as the class within the *.java file.
Additional classes are either accessible
via the other compiled *.class files in the same folder, or can be in sub-folders and the
developer must use the import keyword to enable the program to use them.
Though you are compiling into a binary using javac, the output of this is still not native
code. This has the benefit of allowing it to run on any architecture, but the restriction that
the OS on that architecture needs to have a Java Runtime Environment (JRE) installed that is
compatible with the version of Java used for building it.
A Simple “Hello World”
Say we have the following typical “Hello World” program in Example1.java:
import java.io.*;

public class Example1 {
  public static void main(String args[]) {
    System.out.println("Hello World");
  }
}
Compiling this would generate the Example1.class file, and be accomplished with the following
command:
javac Example1.java
Which can then be executed using the following command. Often, the OS associates the *.class
file type with the java program, so that for more complicated examples using a UI, double-clicking
will be sufficient:
java Example1
Hello World
Note: If you see a message similar to the below, it is merely informational and safe to ignore:
Picked up _JAVA_OPTIONS: -Dawt.useSystemAAFontSettings=on -Dswing.aatext=true
A Slightly more complex example
The following example includes the “Hello World” code, but then goes a step forward to request the user provide a number, which will then be squared and the result displayed back to the user. This will be a great example to begin with because it implements multiple language features:
- Atomic data-type variables (
int) - Arithmetic (multiplication)
- Class object instantiation (there’s a sub-class where the squaring logic occurs)
import java.io.*;
import java.util.Scanner;

public class Example2 {
  public static class SquareClass {
    public SquareClass() {
    };
    public int square(int input) {
      int mul = input*input;
      return mul;
    };
  };

  public static void main(String args[]) {
    Scanner userInput = new Scanner(System.in);
    SquareClass sq = new SquareClass();

    System.out.println("Hello World!");
    System.out.print("Provide an int to square: ");
    int val = userInput.nextInt();
    int sqval = sq.square(val);
    System.out.print("Squared result: ");
    System.out.println(sqval);
  };
};
The above example can be compiled in the same manner as before:
javac Example2.java
However, the result is different. Two files are generated, one of which is a *.class file
containing the compiled code for the inner SquareClass type:
Example2$SquareClass.class
Example2.class
Looking at the above source code, the program has been broken up into two pieces. The primary
user interface code and program flow logic is in the Example2 class, while the mathematics
to perform the squaring operation is in the member class Example2.SquareClass. At compile
time, these have been separated out into independent *.class files.
Java Disassembly
While Ghidra can disassemble and analyze compiled Java classes, if you’ve installed the JDK,
you’ll also have the javap program available. I find that the core tools are a good place to
start. One key piece of information to assist in reading Java disassembly is that the JVM
implements what is known as a stack machine. What this means is that Java instructions
expect to operate on data that is being managed on an operand stack, which is a simple
LIFO structure similar to what you may have implemented in a CS 101 or 102 course. When
executed, an instruction that is expecting arguments will pop them off of the stack, and
then perform the operation on the data, pushing any expected result back onto the top of the
stack, intending for it to be input to the next instruction. The exception to this is a
handful of load and store instructions, which move data between the operand stack and
local variable memory locations, which are themselves managed by the JVM as well. Below
are some references worth keeping handy to help navigate the following examples:
- 2 The Structure of the Java Virtual Machine
- 6 The Java Virtual Machine Instruction Set
- OpenJDK Portal
Note that the above reference the JDK/JRE version 14 specification. There isn’t much difference at this level from earlier versions, such as 7 or 8, but it is worth knowing that documentation for all versions are conveniently hosted at Oracle’s website, even though the OpenJDK project has become the reference implementation for Java.
So, the first file that we will inspect will be the Example2$SquareClass.class file. To do this, we
can run the following command (note the quotes):
javap -c 'Example2$SquareClass.class'
The following is output:
Compiled from "Example2.java"
public class Example2$SquareClass {
  public Example2$SquareClass();
    Code:
       0: aload_0
       1: invokespecial #1                  // Method java/lang/Object."<init>":()V
       4: return

  public int square(int);
    Code:
       0: iload_1
       1: iload_1
       2: imul
       3: istore_2
       4: iload_2
       5: ireturn
}
We will focus on the code in the square(int) function. You will notice a set of iload_ and an
istore_ instruction. The numeric part of these instructions indicate which local variable the load
or store operation is acting upon. These are zero-based, so the first one is 0, and this usually
refers to the this reference in Java. The remaining will be assigned to the arguments passed to
the function, and finally past that there are additional that can be used to represent your local
variables (in the order they are declared). The i indicates this is an int operation. The load
operations will move data from the numbered local variable onto the top of the stack, while the
store operations will do the inverse - pop the top of the stack, and store it in the numbered
local variable. The numbers in the left-hand column indicate the byte address of the instruction.
As can be seen, most of the JVM instructions fit into a single byte, which is in contrast to the
x86 and amd64 instruction sets. Much of this is the result of the limitation enforced by implicit
stack addressing. Each frame of execution, typically a function, maintains a dedicated operand
stack and local variable store.
To break the above function down:
0: iload_1: Push a copy of variable #1 onto the stack1: iload_1: Push a copy of variable #1 onto the stack (again). Now the stack contains two copies of variable 12: imul: A binary operation - pop the two values at the top of the stack (in this case, the two copies of variable 1), multiply them together, and then push the result of this operation onto the operand stack3: istore_2: Pop theintvalue off of the top of the operand stack, and store it in variable #24: iload_2: Push a copy of variable #2 onto the stack. The reason we have done this and the prior instruction are because we declared variable 2 asint mulin the source code earlier. In order to ensure thatint mulcontains a copy of this multiplication, the value must be popped off (to store it), and then pushed back on. There isn’t an operation to simply copy but leave the stack intact.5: ireturn: Pop theintvalue off of the top of the stack, and push it onto the stack of the calling function, then return execution to the next instruction after the function call that brought us here.
Using Ghidra
You can also import the *.class files directly into a project, similar to how we’ve loaded natively
compiled EXE’s and DLL’s earlier in the class. Ghidra’s disassembler understands the JVM bytecode, and
even its decompiler can produce reverse-engineered and readable source code for the compiled functions.
Below is a screenshot of this. Similar to EXE’s and DLL’s, you can navigate the functions in the Symbol Tree panel (at middle-left in the screenshot), by expanding the Functions branch. When I loaded this file, it did not put any of the Java class information in the Classes branch, so this may be program structure that Ghidra doesn’t interpret (yet):
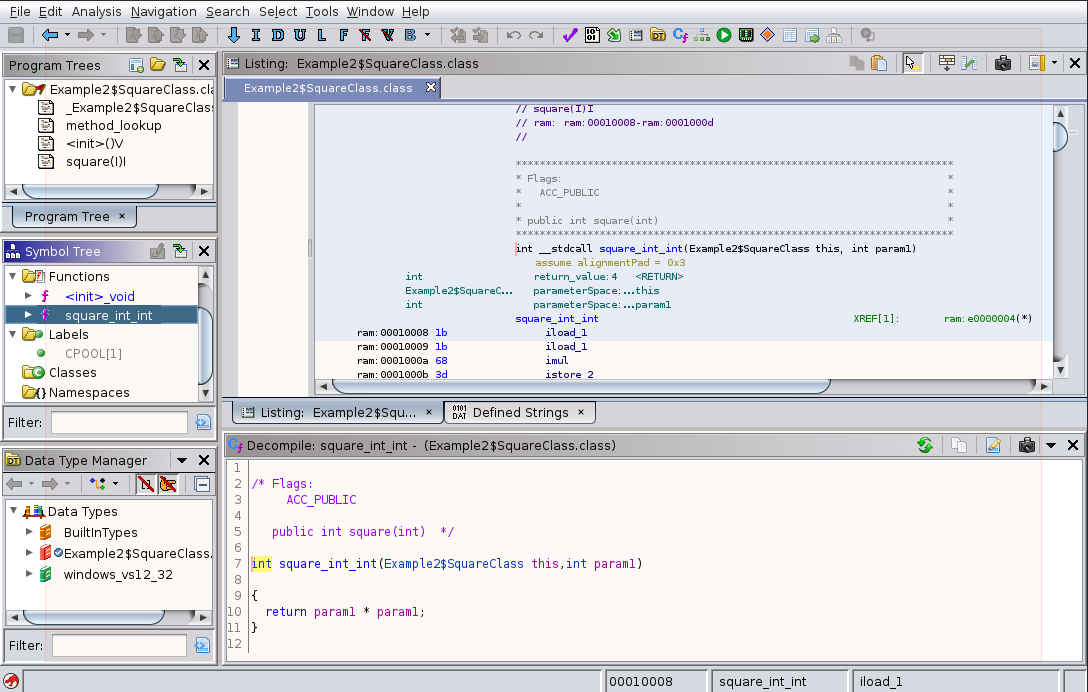
In the above screenshot, I have already selected the method we were disassembling earlier with javap,
Example2.SquareClass.square(int).
The Ghidra listing view here also gives a more detailed description of the disassembled function, including:
- The location within Java memory that it occupies (
0x00010008-0x0001000d) - The bytes that comprise the byte code:
1b 1b 68 3d 1c ac- these could be helpful if we wanted to write ayarasignature for the code. - The
parameterSpace:annotations also describe what occupies the local variable slot numbers, going into the function call - You get the nice benefit of
XREFlinks, as with other disassembly
//
// square(I)I
// ram: ram:00010008-ram:0001000d
//
*************************************************************************
* Flags:                                                                *
*   ACC_PUBLIC                                                          *
*                                                                       *
* public int square(int)                                                *
*************************************************************************
int __stdcall square_int_int(Example2$SquareClass this, int param1)
                              assume alignmentPad = 0x3
        int                  return_value:4   <RETURN>
        Example2$SquareC     parameterSpace:  this
        int                  parameterSpace:  param1
                          square_int_int                   XREF[1]:       ram:e0000004(*)
ram:00010008 1b                iload_1
ram:00010009 1b                iload_1
ram:0001000a 68                imul
ram:0001000b 3d                istore_2
ram:0001000c 1c                iload_2
ram:0001000d ac                ireturn
A readable approximation of Java source code is also output. Note that the resulting code is different from what was written in the original source. It appears that the decompiler deduced some optimizations that could be made to improve the brevity and compactness of the resulting code. This is an important characteristic to keep in mind when reading decompiled code: it is an approximation of what the author wrote derived from the presence or absence of information in the compiled binary.
/* Flags:
     ACC_PUBLIC

   public int square(int)  */

int square_int_int(Example2$SquareClass this,int param1)

{
  return param1 * param1;
}
In the case of the above code, the decompiler has optimized the code to remove the
int mul local variable that was an intermediate storage step between the multiplication
operation and passing the result back to the calling function.
Also of note is that, due to the separation of class data into multiple *.class files,
Ghidra won’t offer as helpful links between classes across files. This is in contrast to
C and C++ that we have analyzed in the past where multiple modules and functions are
consolidated into a single executable container.
Separating the Java Code into Multiple Files
I can break this up into a more modular program, which also allows packaging and reuse of
the SquareClass code. What I’ve decided to do is create a new folder cs6038/ within
my project folder, and move the whole SquareClass code out of the example class, and into
a new file cs6038/SquareClass.java. Note that I removed the static keyword in the class
declaration, and also have added a new package declaration that must be included where
you wish to define new Java modules. The new cs6038/SquareClass.java is below:
package cs6038;

public class SquareClass {
  public SquareClass() {
  };
  public int square(int input) {
    int mul = input*input;
    return mul;
  };
};
The newly trimmed down Example3.java, in the base project folder, is below:
import java.io.*;
import java.util.Scanner;
import cs6038.SquareClass;

public class Example3 {
  public static void main(String args[]) {
    Scanner userInput = new Scanner(System.in);
    SquareClass sq = new SquareClass();

    System.out.println("Hello World!");
    System.out.print("Provide an int to square: ");
    int val = userInput.nextInt();
    int sqval = sq.square(val);
    System.out.print("Squared result: ");
    System.out.println(sqval);
  };
};
Note that I simply removed the public static class SquareClass definition,
changed the name of the base class to Example3 and added an import line
to tell it where to get the SquareClass implementation from.
Running this (I entered the number 44 when prompted):
java Example3
Hello World!
Provide an int to square: 44
Squared result: 1936
This example demonstrates a more typical example of one way you will likely find
java programs deployed in the wild. In this case, the program looks for modules
(packages) in the subdirectories of where it executed on the system. Alternately,
there is a CLASSPATH environment variable that is typically set on any system
with java installed that further tells where to find the packages that are often
used among multiple Java applications.
Java Archives (JAR) - Portable Java Applications
An increasingly common packaging technique is the use of Java ARchives (JAR files).
At its core, this is a ZIP file that contains a specific embedded directory layout,
as well as some metadata. Java can load these as a wholly-contained application,
so that an application author doesn’t need to worry about installing a bunch of
*.class files into a complex directory hierarchy on a user’s system. The user
simply copies the *.jar file where they’d like the application to live, and then
it is able to execute all on its own.
We can bundle the above project into a JAR file named ex3app.jar (you can actually
choose any name you want for this), using the following jar command:
jar --create --file ../ex3app.jar --main-class=Example3 Example3.class cs6038/SquareClass.class
This creates an ex3app.jar file in the parent directory. I did this on purpose to
demonstrate that this program is running without having to know where you stored the
compiled SquareClass.class at. So, to run it (from the parent folder):
cd ..
java -jar ex3app.jar
Hello World!
Provide an int to square: 444
Squared result: 197136
In this case, I gave it an input of 444 when asked, and it properly squared that for me.
Now you simply put ex3app.jar anywhere you want on a system with a compatible JRE installed,
and it will be able to work. It doesn’t need to install any *.class files locally, as long
as they were bundled inside the jar file.
Since this is a ZIP file, you can use the unzip or 7z utilities to list and extract the
contents. Additionally, Java offers dedicated functionality within the jar utility that was
used to create it in the first place. I will use the 7z utility in later examples, but the
following commands can be used to list the contents. Simiarly, each utility has their own
arguments that can be used to extract some or all of the contents:
jar -t --file ex3app.jar
unzip -l ex3app.jar
7z l ex3app.jar
The output of the 7z utility:
Scanning the drive for archives:
1 file, 1323 bytes (2 KiB)

Listing archive: ex3app.jar

--
Path = ex3app.jar
Type = zip
Physical Size = 1323

   Date      Time    Attr         Size   Compressed  Name
------------------- ----- ------------ ------------  ------------------------
2020-04-12 22:30:04 D....            0            2  META-INF
2020-04-12 22:30:04 .....           76           75  META-INF/MANIFEST.MF
2020-04-12 22:03:14 .....          774          511  Example3.class
2020-04-12 22:03:02 .....          271          203  cs6038/SquareClass.class
------------------- ----- ------------ ------------  ------------------------
2020-04-12 22:30:04               1121          791  3 files, 1 folders
In addition to the *.class files that were explicitly added on the command line, the jar
application also add a META-INF folder containing a MANIFEST.MF file. This file is used
to tell java how to execute the bundled application when called with the -jar option.
One of the nice features of 7z is that it offers an easy way to dump the contents of an
extracted file to the terminal, rather than having to write it to a new file first. This
is accomplished using the -so option (stdout) when running the e (extract) command:
7z e -so ex3app.jar META-INF/MANIFEST.MF
Manifest-Version: 1.0
Created-By: 11.0.6 (Debian)
Main-Class: Example3
The above contents of the MANIFEST.MF file tell Java what system this was created on,
what version of the Manifest specification is being used, and what the name of the “main”
class is (which class to execute the main function from). When dealing with a *.jar
file that is complex and has many embedded *.class files within it, this can be very
helpful in determining where to start.
Loading the JAR Into Ghidra
Ghidra can actually read JAR files as well, and will step through each file contained within
that it recognizes as a supported binary format. You can simply Import (use the I key from
the project view) and choose the *.jar file from the file selection dialog. You will receive
a dialog prompting you to import as Single File, Batch, or File System. The Single
option will allow you to override the built-in archive type detection and force import as a
binary file regardless, while File System will display a dialog displaying the file names
contained within the archive and its embedded folders as a file-picker. This allows you to
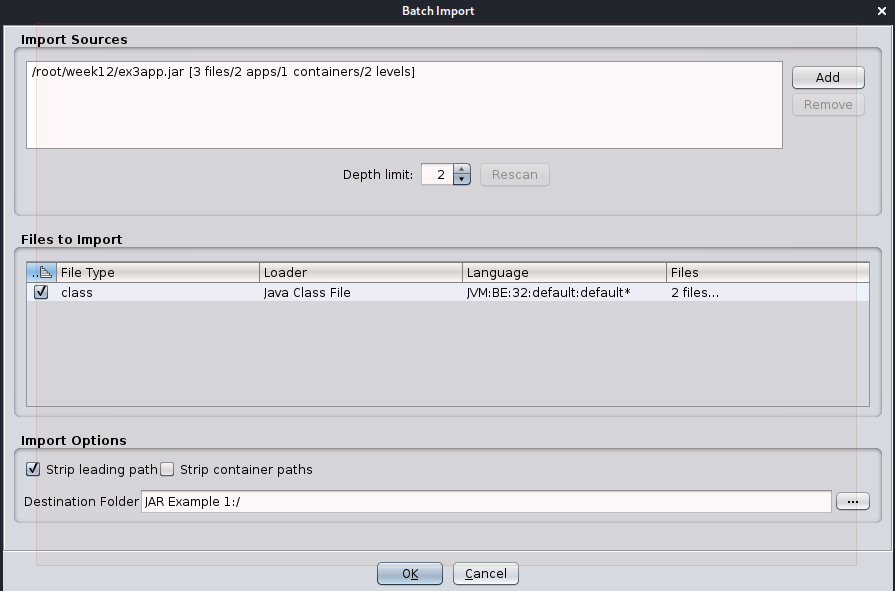
pick and choose what components you want to import into Ghidra. Finally, the Batch choice
is what will be used for ex3app.jar, and it will pass you over to a Batch Import window
that displays some summary statistics about the contents of the archive to you, and gives you
the control to pick and choose what is imported based upon following or ignoring anything
matching certain criteria.
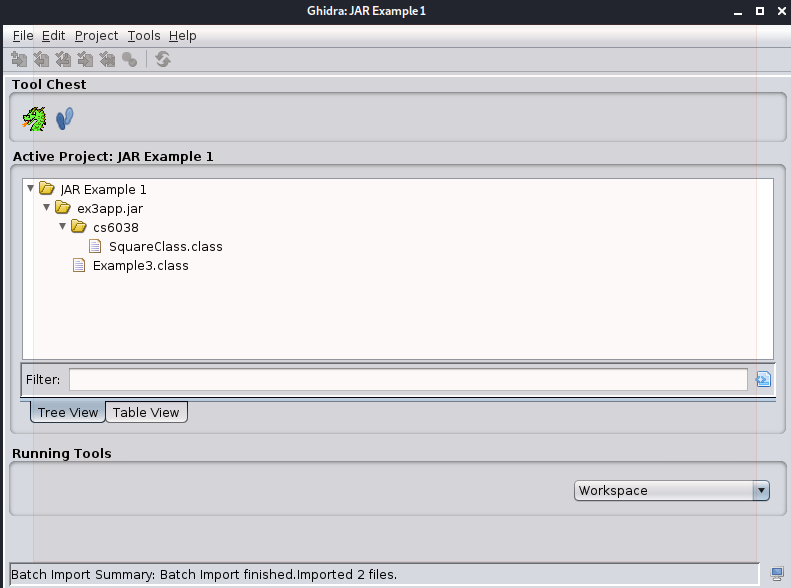
Once you click OK and wait for the import, the contents will be displayed in the project
view, and sub-folders within the project will also be created to mirror the layout of the
application within the jar.
Using the JAva Decompiler (JAD)
Your Kali images also come paired with the jad tool, which is an unmaintained Java
Decompiler that was originally written by Pavel Kouznetsov. You can read more about it
on the following Wikipedia page:
The program is a command-line utility that performs pretty good reconstruction of Java
source code from the byte code. Ghidra converts the JVM bytecode to an intermediate
PCode representation, which is then used for the source code reconstruction. This is in
contrast to Ghidra, which adds one more level of abstraction by translating the JVM bytecode
to Ghidra PCode. That process necessarily loses some precision, resulting in a decompiler
output that may not match the original Java code (as we saw earlier). Additionally, jad
doesn’t understand JAR files natively, so you’ll need to use a tool like 7z or similar
to unpack the classes/folders first.
To use jad in its most straightforward decompiler case:
jad -r Example3.class cs6038/SquareClass.class
The above will create a new *.jad file in the same directory where the *.class files
listed on the command line are (storing within subdirectories isn’t default behavior, so
I used the -r option to force this behavior).
A more advanced example, when you don’t know the *.class files ahead of time could be to
use the find command to discover them, and then execute jad -r on each of them as they
are encountered:
find . -type f -name \*.class -exec jad -r {} \;
As JAD performs a direct translation from bytecode to source code, the resulting output
may more closely reflect the author’s code, as is demonstrated below with the output written
into cs6038/SquareClass.jad:
package cs6038;


public class SquareClass
{

    public SquareClass()
    {
    }

    public int square(int i)
    {
        int j = i * i;
        return j;
    }
}
The jad program has a number of additional features to further clean up the output, such
as the -nonlb and -noctor options.
Attempting to accurately reflect the compiled Java code may not always be the most desirable output. For example, there are a number of ways to obfuscate Java code, and the higher-level abstraction and analysis that Ghidra performs to map simple Java bytecode to a more expressive PCode representation may yield benefits in improved readability. This is a great example of a type of case where it is beneficial to have multiple tools that offer the same capability but do so in different ways.
tags: malware java ghidra lecture