Simple Program Flow Editing with Immunity
by Coleman Kane
Now, we will perform some program flow editing on a few example binaries. This will help better utilize some of the features that make Immunity Debugger so powerful for working with malware. Once of the common challenges is when malware running in our lab doesn’t follow the same execution paths that it would follow on a user’s system. In these events, we need to modify program flow to accommodate this and modify program behavior so it performs the operations we want to analyze.
Install the “MingW” developmnent suite in your Kali VM to be able to cross-compile Windows binaries on Linux:
apt install mingw-w64
Despite the name, this will install the 32-bit utilities, too, which is mainly what we want. This gives us the ability to build new Windows executables from C and C++ code within the Kali environment.
If you recall, when we analyzed the “Revolution Backdoor” sample, there were only about
4-5 functions defined in the C++ code, but Ghidra displayed many functions to us.
Through analysis, we determined that the entry point of the program is not pointing
at the main function that was written into the source code, but rather to another
function which did some start-up work and eventually called our main function once
a number of additional “start up” work was completed.
Example code for the exercises below:
Writing a simplified EXE
Building a simplified EXE is helpful, as it allows us to analyze specific code without
having to navigate through all of the additional “standard library” code provided by
the compiler. We can write a function like the following, using the WinMain function
as our entry point, and have a simpler analysis project:
#include <windows.h>

int WINAPI
WinMain(HINSTANCE hInstance, HINSTANCE hPrevInstance,
        LPSTR lpszCmdLine, int nCmdShow) {
  MessageBoxA(NULL, "TEST", "TEST", MB_OK);
  return 1;
}
We also need to tell the compiler this is what we want, as it will not automatically
determine what we are trying to do here. Using the following command, with the above
code in ex1.cpp, we can compile a slimmed-down EXE:
i686-w64-mingw32-g++ -o ex1.exe -mconsole -nostdlib -s ex1.cpp -luser32
Looking at the file, we can see that it is only 2048 bytes, which is tiny:
-rwxr-xr-x 1 root root 2048 Feb 16 23:24 ex1.exe
If I left out the -nostdlib parameter, additional code will be added, making the
EXE grow to over 11kB in size.
Analyzing our Simple EXE
The EXE that was built contains a single function, named WinMain in the source (but
the -s option will strip the symbols for us), which simply calls the MessageBoxA
function to display a dialog to the user, pausing program execution, until the user
clicks “OK”. It then returns to Windows with a return value of 1.
We can load this up in Immunity Debugger and we can easily make out the components of the program from the source code, in the disassembly view:
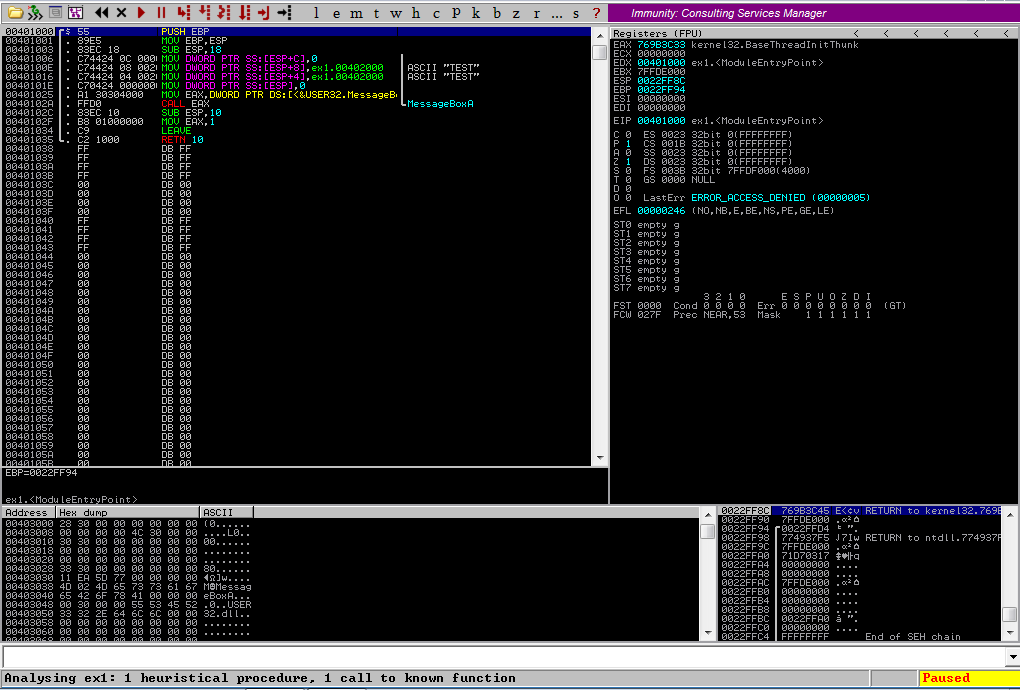
As you can see, the only code displayed in the disassembly view (and, if you load it up
in Ghidra, the only code at all) is the disassembly for the WinMain function that was
provided above. The program is paused, and the first instruction to execute next is:
PUSH EBP
Looking at the code, our function call begins at line 4, where the value 0 is moved
onto the stack, representing the value that the MB_OK macro represents. It is worth
noting that, when arguments to functions are passed on the stack, they are typically
moved onto the stack in reverse order, from last to first (right to left).
Doing a step-into (F7) or step-over (F8) 8 times places the EIP and the cursor on the
CALL EAX line.
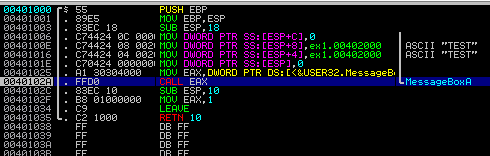
Immunity Debugger recognizes this as a function call to MessageBoxA
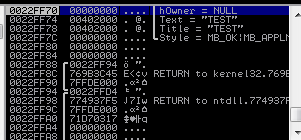
and updates the stack view and the CPU state’s register view to reflect this. In the
stack view (lower right), you can now see the parameter names and which values they
correspond to have been noted by the debugger. You can even see that the Style
parameter was interpreted for us as MB_OK|MB_APPLMODAL, which was very handy. These
values are documented in the MSDN documentation and this informs us about how the dialog
will behave. This is a key benefit to Immunity Debugger - it contains a bunch of features
that will decode well-known parameter types in Windows for us.
Doing a step-over (F8) at this point, will cause the dialog box to display. It may
pop up behind your debugger, so you might need to Alt+Tab to find it. You’ll also notice
that the lower-right corner of the debugger window displays “Running” rather than
“Paused” now. This is because the code inside of the MessageBoxA function contains
a loop which will loop forever until the “OK” button is clicked. When we go ahead and
click this button, the program will get Paused again, but this time will be waiting
on the following line of code:
SUB ESP,10
Next, click the “Restart Program” button, which looks like the two arrows pointing left: ⏪. This will restore the program execution state to where we first started.
If you run the program from the beginning, using the “Play” button (Run, F9) the program will run, then wait for you to click “OK”, then terminate. Restart the program again after you try this, and we’ll move on to the next lesson.
Modifying Program Flow
The next example we will work from is a modification to the last example, which will be named
ex2.cpp:
#include <windows.h>
#include <wincon.h>

void
writestr(const char *outstr) {
  int slen = lstrlenA(outstr);
  HANDLE std_out = GetStdHandle(STD_OUTPUT_HANDLE);

  WriteConsoleA(std_out, outstr, slen, NULL, NULL);
}

int WINAPI
WinMain(HINSTANCE hInstance, HINSTANCE hPrevInstance,
        LPSTR lpszCmdLine, int nCmdShow) {
  MessageBoxA(NULL, "TEST", "TEST", MB_OK);
  writestr("This is printed to the console!\n");
  return 1;
}
The above code adds a new function call just after the MessageBoxA call that we looked
at last time. So basically, this does one more action. As I’m trying to simplify the
example, I’ve written a very simplistic implementation of the puts function, named
writestr, which writes a string to the command line console. In a nutshell, the above
code will run, wait for you to click “OK” in the dialog, and then write the string
“This is printed to the console!” after that, and then exits.
Compiling this program is similar to before, with a slight modification that we have
to tell the compiler that WinMain is the entry point. I helpful note here, C++ will
change the function name to _WinMain@16, and we have to provide that name to the linker
in order to get the program to build and execute properly. Otherwise, the first function
encountered, writestr, will be presumed to be the entry point. This is definitely not
what we want.
i686-w64-mingw32-g++ -o ex2.exe -mconsole -nostdlib -s ex2.cpp -luser32 -lkernel32 -Wl,-e_WinMain@16
Again, ex2.exe is a small 2048kB program:
-rwxr-xr-x 1 root root 2048 Feb 17 14:18 ex2.exe
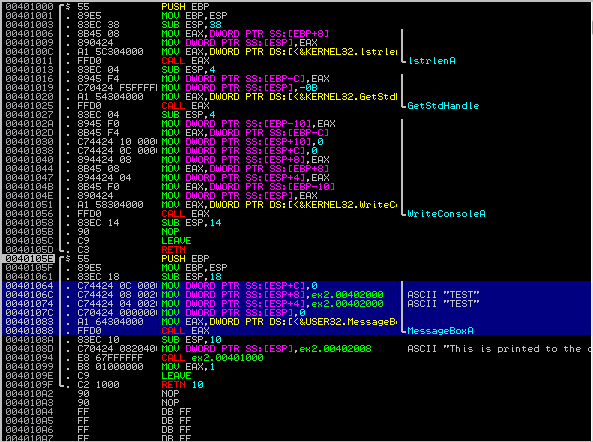
Loading ex2.exe up into ImmunityDebugger, I see that the entry point is no longer at
0x00401000, but now points to 0x40105e (your mileage may vary slightly). In fact, I can scroll
the disassembly view up in Immunity and reveal the disassembly for my writestr function,
in addition to the disassembly for my WinMain function.

The first goal that I will present will be: We would like to use the debugger to execute the program such that it will display the message to the console, but never prompt the user to click OK to the dialog box.
Bypassing using stepping
The first and most straightforward approach would be to use single-stepping to bypass the code. For its part, when you load the program into Immunity Debugger, it also pops up a terminal window that will display any console output.
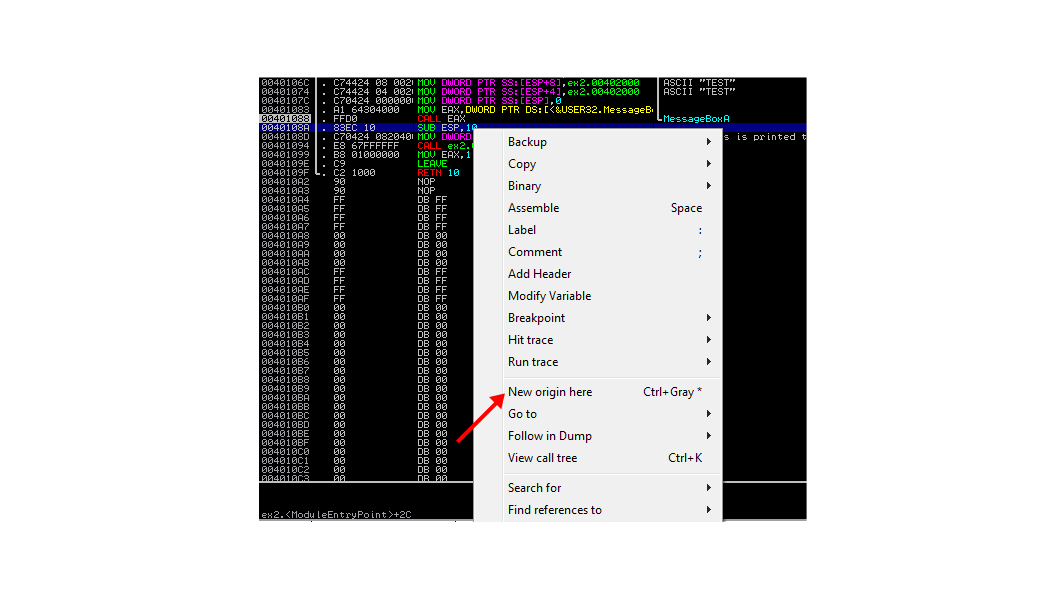
What we will do next is single-step until the cursor is on, but doesn’t execute, the
CALL EAX line (the one listed in the image at 0x00401088). This occurs by hitting
the F8/F7 key, or doing step-over/into command, 8 times.
Once you have the CALL EAX selected with the execution cursor, left-click, then right-click on
the following instruction (which will move the blue selection cursor down) SUB ESP,10. Select
the New origin here choice, and it will move the execution cursor (representing EIP)
down to the selected instruction.
If you then click run, the program will display the console output, and terminate normally. You have successfully used the debugger to manually bypass execution of undesirable code. If you don’t see the terminal window, you might need to navigate to it. The terminal window title contains the full path of the program.
Bypassing using NOP patching
Being able to bypass the undesirable code using the above technique is nice, but it is also tedious. Thankfully, there’s a better way using a technique called run-time “patching”.
To begin, we will load the same ex2.exe EXE again, and display the view we had at the beginning
of the previous section. Select the CALL EAX instruction again.
Then, either right-click on the selected instruction to bring up the same menu as last time, and choose
Assemble, or simply hit the SPACE bar, which is the short cut for the Assemble
operation. The Assemble operation allows you to overwrite one line of code with
your own instruction. In this case, we want to replace code that does a call, with code
that will have no effect. In x86-32 and x86-64, this is known as the
NOP instruction. This is represented
with the single-byte value of 0x90.
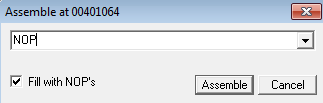
When you see the Assemble dialog pop up, it will display the instruction that you
have selected. Replace the text in this textbox with the text NOP as illustrated above.
Make sure that the Fill with NOP’s option is selected, and click Assemble.
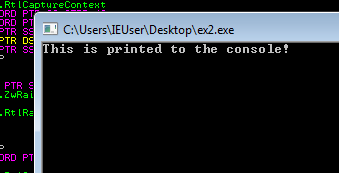
This leaves a modification in memory, but not on disk, for this particular program. We can now run the program (F9) and see that it runs to completion, displaying the output to the console, without presenting the “OK” dialog.
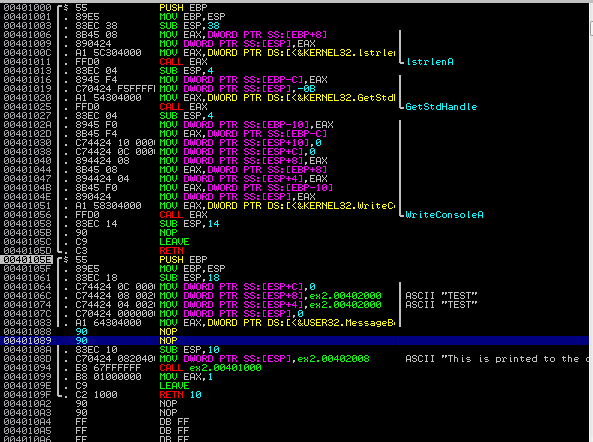
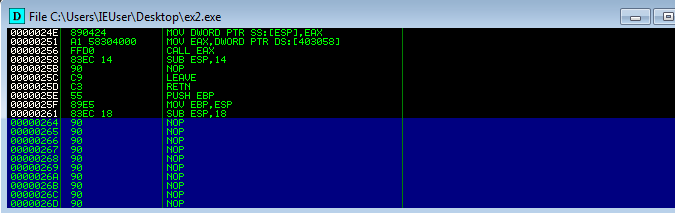
For a quicker method of doing this to multiple instruction, we can select multiple lines
and then use the “Fill” operations. First, restart the program using the “rewind” button. Next,
we will left-click on the MOV DWORD PTR SS:[ESP+C],0 line, and drag all the way down to the
CALL EAX instruction. You should see 6 lines highlighted, which comprise the 4 argument
moves and the indirect call operation (performed by moving the function pointer into EAX)
and then CALL EAX:
Right-click on the selection to bring up the context menu. Navigate to Binary and choose
the Fill with NOPs option. This will immediately fill all 6 of the selected instructions
with NOP bytes 0x90, replacing any other data there. You should now see a long line of NOP
instructions - about 38 of them to be precise, and your program no longer fits on a single
screen (unless your font size is really small).
Similar to above, you can now run the program and it will not prompt you to click “OK” in the
dialog, but it will still print output to the console. What we’ve just done here is not only
to replace the function CALL EAX, but also to replace all of the code responsible for passing
its arguments. The single-line patch still left behind the argument preparation behavior, but
then simply discarded the arguments after moving them to the stack. This second approach is
arguably cleaner, as it results in less movement of data during execution, by replacing the
function call as well as the code who’s sole function is preparation for that call.
Patch Window
When you restart the program, it restores the orginal bytes for all of the patches you’ve made. However, Immunity Debugger does not forget about them. You can click the “p” button in the toolbar, and it will bring up the “Patches” window. This window will allow you to review and manage all of the patches you’ve put in place, as well as its current status (Active vs. Removed).
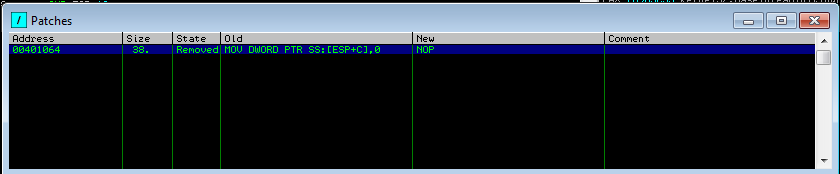
Using the right-click context menu after selecting a patch in the window, you can apply the patch (shorcut is also SPACE BAR). If you want Immunity to forget the patch, simply choose Delete record, or press the Del key (its shortcut).
Saving Changes
Immunity Debugger does have the capability to save your changes to disk. Conveniently, this can be done easily to another file, enabling you to manage changes across multiple output files. The effect here is that you end up with an EXE that runs with the modifications just like the examples we did inside Immunity Debugger, but you no longer need Immunity Debugger to get the desired behavior. Among the best uses for this are cases where the malware blocks with a user prompt, detects when it is running inside a VM, or contains an encrypted section that needs to be decrypted to execute properly.
When the patches are applied, you can right click anywhere on the disassembly listing to bring up the context menu again. From there, you can choose the Copy to executable sub-menu, which will display Selection and, if you have the patch(es) applied, All modifications. Choose the All modifications option and another prompt will display confirming you want to Copy all. Once clicked, a new window will show up, displaying disassembly, and having the title of the current EXE.
This window gives one more chance to review before the data is saved to a file. Right click
and choose Save file, and you will be prompted with the familiar Windows File Save dialog.
In this dialog you can choose to overwrite the existing file (not recommended), or you can
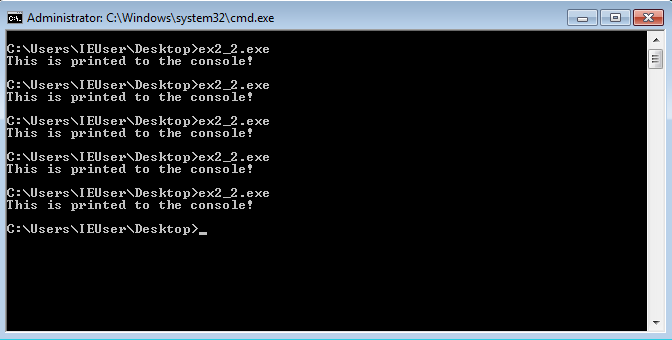
choose to write the data to a new file. Create a new EXE of your own choosing (I chose ex2_2.exe
for my example).
Once complete, you should be able to open a cmd.exe window, cd to the directory where you
saved the file, and run this patched version of the EXE, as many times as you want, without
having the dialog pop up. Congratulations, you’ve successfully patched a bypass of undesirable
code into the EXE.